Most layer cakes are all about the frosting. While there’s nothing wrong with that, frosting-heavy cakes put a lot of pressure on the baker to create perfectly smooth sides, appealing swoops and swirls, or elaborate decorations piped using a battery of bags and tips. Naked cakes, on the other hand, take the pressure off and result in beautifully boho or rustic-looking cakes that can be just as eye-catching as their fully dressed counterparts.
What Is A Naked Cake?
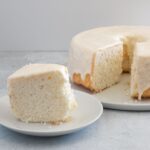
A naked cake is a layer cake with bare or almost bare sides. Christina Tosi of Momofuku’s Milk Bar popularized this style of cake around 2010.
There are two types of naked cakes. One has frosting between the layers and a very thin, transparent layer of frosting on the sides of the cake. This is essentially the same as a crumb coat. The second type has frosting between the layers only, as in this strawberry cake.
How To Make A Naked Cake
One of the nicest things about naked cakes is that they’re a little easier to assemble than a typical layer cake because you don’t have to worry as much about decoration. Simply make your cake layers, then layer them with your preferred frosting and, if desired, add a light crumb coat of frosting to the outside of the cake.
Naked cakes can be garnished with fresh fruits, edible or non-toxic flowers, chocolate curls, candy, or anything you might garnish a normal layer cake with.
Frosting Ideas for Naked Cakes
You will need about 3 1/2 cups of frosting for this cake recipe.
- Classic Buttercream Frosting
- Chocolate Buttercream
- Italian Buttercream
- Vegan Buttercream
- Cream Cheese Frosting
Tips for Making A Naked Cake
- Use boxed cake mix to make this recipe even easier.
- Note that the nutrition information for this recipe is only taking the cake layers themselves into account.
- To get cake layers of the exact same size, weigh the batter on a kitchen scale, then divide that by three. Place the cake pans on the scale to measure out the perfect amount of batter.
- If you added too much frosting at first, firmly scrape excess frosting away while smoothing it out at the same time using a metal bench scraper or offset spatula.
- When frosting between the cake layers, add a large dollop of frosting in the center of the layer, then use an offset spatula to push the frosting to the very edge of the cake and just beyond. Any frosting that spills out can be smoothed and thinned out when making the crumb coat.
- A large offset spatula is a game-changer for frosting layer cakes. The larger surface area helps you spread the frosting evenly and thinly.
- Because you need less frosting for a naked cake than a traditional layer cake, you will end up with extra frosting. Save it for other baking projects like cake pops or serve it with fruit and graham crackers as a dip.
- Bring the cake to room temperature before serving. Because this is a butter cake, the fat in the cake hardens at cool temperatures, which can cause the cake to have a stodgy texture if it is served straight from the fridge or freezer.
Ingredients
-
Cooking spray
-
3 cups (360 grams) all-purpose flour
-
1 tablespoon baking powder
-
1/2 teaspoon fine salt
-
1 cup plus 2 tablespoons (9 ounces) unsalted butter, softened
-
2 1/4 cups (445 grams) granulated sugar
-
1 tablespoon vanilla extract
-
1 1/2 cups whole milk
-
9 large egg whites
-
1 recipe Buttercream Frosting
Steps to Make It
Make the Cake Layers
-
Gather the ingredients. Preheat oven to 350 F. Spray 3 (8-inch) round cake pans with cooking spray and line the bottoms with parchment paper.
-
Whisk together the flour, baking powder, and salt in a medium bowl. Set aside.
-
Beat the butter and sugar together at medium speed with an electric mixer until light and fluffy, about 5 minutes. Beat in the vanilla.
-
Whisk together the milk and egg whites in a separate bowl until just combined.
-
Gradually add the flour mixture and milk mixture alternately to the butter mixture, beginning and ending with flour mixture, mixing at low speed until just combined. Scrape the bowl well with a rubber spatula as needed.
-
Divide the batter evenly between the prepared pans.
-
Bake the cakes on the middle oven rack for 30 to 35 minutes, or until a toothpick inserted in the center of each cake comes out clean.
Cool in pans on wire racks for 10 minutes; remove cake layers from pans and cool completely on wire racks, about 1 hour.
-
Wrap cake layers individually in plastic wrap; freeze for 4 to 6 hours. (This step is optional, but frozen layers are easier much easier to work with. We recommend freezing for at least one hour when making a naked cake to ensure that crumbs don’t break off into the icing.)
Fill and Frost the Cake
-
When ready to frost the cake, remove the layers from freezer and unwrap. Level any uneven layers with a serrated knife if necessary.
If you made the buttercream ahead of time, make sure it is at room temperature for easy spreading. If needed, beat the frosting with an electric mixer to make it smooth and silky again.
-
Place a dollop of frosting in the center of a cake stand or serving plate (to keep the cake from sliding) and place 1 cake layer on top of the frosting.
-
Spoon about 1 cup of frosting directly on top of the first layer. Using an offset spatula, spread the frosting evenly over the top and just past the edges of the first layer.
-
Place the second cake layer upside-down directly on top of the first layer; repeat the frosting process.
-
Place the third cake layer on top of the second layer. Spoon about 1 1/2 cups of frosting directly on top of the third layer, and lightly frost the entire cake, starting with the top and moving down the sides, leaving the layers largely exposed. Place the assembled cake back in the freezer for 20 minutes to allow the icing to set.
-
Decorate as desired.
How To Store A Naked Cake
A naked cake can be stored in a cake keeper in the refrigerator for up to 1 week. If desired, spread a thin layer of leftover frosting on any cut surfaces to keep the cake from drying out.
Layer cakes can also be frozen. Place the cake on a cardboard round on a sheet pan and freeze solid. Then wrap the cake in several layers of plastic wrap. Keep frozen for up to 3 months. Unwrap and thaw overnight in the refrigerator, then bring to room temperature before serving.
Store leftover frosting in an airtight container in the refrigerator for up to 1 week or in the freezer for up to 3 months. Bring the frosting back to room temperature, then whip with an electric mixer to restore its smooth and fluffy texture.
Recipe Variations
- Almost any cake can be turned into a naked cake, so use your favorite vanilla, chocolate, red velvet, or spice cake layers and any fluffy frosting to make your dream cake.
- You can use the buttercream to form “dams” between cake layers, filling the cakes with fruit preserves, compotes, or citrus curd. The buttercream dam ensures the filling won’t leak out.
- Place small whole berries like raspberries or blackberries on the buttercream between the cake layers.